Solace
Creating a data generator for Solace. You will build a Docker image that will be able to populate data in Solace for the queues/topics you configure.

Requirements
- 10 minutes
- Git
- Gradle
- Docker
Get Started
First, we will clone the data-caterer repo which will already have the base project setup required.
If you already have a Solace instance running, you can skip to this step.
Solace Setup
Next, let's make sure you have an instance of Solace up and running in your local environment. This will make it easy for us to iterate and check our changes.
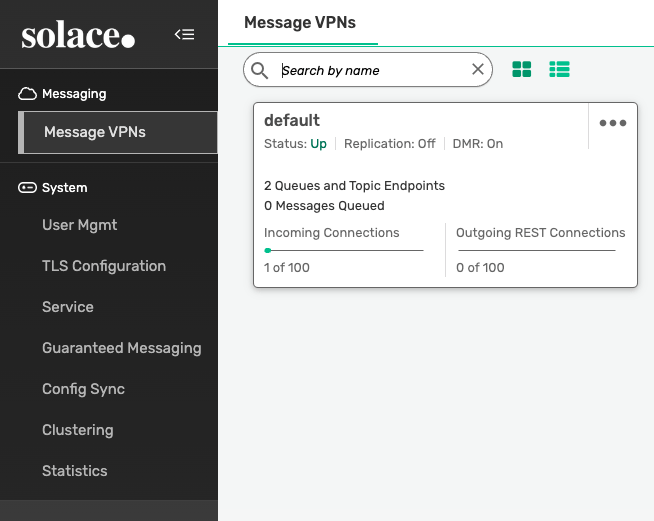
Open up localhost:8080 and login with admin:admin and check there is the default VPN like
below. Notice there is 2 queues/topics created. If you do not see 2 created, try to run the script found under
docker/data/solace/setup_solace.sh and change the host to localhost.
Plan Setup
Create a file depending on which interface you want to use.
- Java:
src/main/java/io/github/datacatering/plan/MyAdvancedSolaceJavaPlan.java - Scala:
src/main/scala/io/github/datacatering/plan/MyAdvancedSolacePlan.scala - YAML:
docker/data/custom/plan/my-solace.yaml
In docker/data/custom/unified/my-solace.yaml:
- Click on
Connectiontowards the top of the screen - For connection name, set to
my_solace - Click on
Select data source type..and selectSolace - Set
URLassmf://host.docker.internal:55554- Optionally, we could set the JNDI destination (queue or topic) but we would have to create a new connection for each queue or topic
- Click on
Create - You should see your connection
my_solaceshow underExisting connections - Click on
Hometowards the top of the screen - Set plan name to
my_solace_plan - Set task name to
solace_task - Click on
Select data source..and selectmy_solace
This class defines where we need to define all of our configurations for generating data. There are helper variables and methods defined to make it simple and easy to use.
Connection Configuration
Within our class, we can start by defining the connection properties to connect to Solace.
var accountTask = solace(
    "my_solace",                        //name
    "smf://host.docker.internal:55554", //url
    Map.of()                            //optional additional connection options
);
Additional connection options can be found here.
val accountTask = solace(
    "my_solace",                        //name
    "smf://host.docker.internal:55554", //url
    Map()                               //optional additional connection options
)
Additional connection options can be found here.
In a unified YAML file:
- We have already created the connection details in this step
Schema
Let's create a task for inserting data into the rest_test_queue or rest_test_topic that is already created for us
from this step.
Trimming the connection details to work with the docker-compose Solace, we have a base Solace connection to define
the JNDI destination we will publish to. Let's define each field along with their corresponding data type. You will
notice
that the text fields do not have a data type defined. This is because the default data type is StringType.
{
    var solaceTask = solace("my_solace", "smf://host.docker.internal:55554")
            .destination("/JNDI/Q/rest_test_queue")
            .fields(
                    //field().name("partition").type(IntegerType.instance()),   can define JMS priority here
                    field().messageHeaders(   //set message properties via headers field
                            field().messageHeader("account-id", "body.account_id"),
                            field().messageHeader("updated", "body.details.updated_by-time")
                    )
            ).fields(
                    field().messageBody(
                            field().name("account_id").regex("ACC[0-9]{8}"),
                            field().name("year").type(IntegerType.instance()).min(2021).max(2023),
                            field().name("amount").type(DoubleType.instance()),
                            field().name("details")
                                    .fields(
                                            field().name("name").expression("#{Name.name}"),
                                            field().name("first_txn_date").type(DateType.instance()).sql("ELEMENT_AT(SORT_ARRAY(body.transactions.txn_date), 1)"),
                                            field().name("updated_by")
                                                    .fields(
                                                            field().name("user"),
                                                            field().name("time").type(TimestampType.instance())
                                                    )
                                    ),
                            field().name("transactions").type(ArrayType.instance())
                                    .fields(
                                            field().name("txn_date").type(DateType.instance()).min(Date.valueOf("2021-01-01")).max("2021-12-31"),
                                            field().name("amount").type(DoubleType.instance())
                                    )
                    )
            )
            .count(count().records(10));
}
val solaceTask = solace("my_solace", "smf://host.docker.internal:55554")
  .destination("/JNDI/Q/rest_test_queue")
  .fields(
    //field.name("partition").type(IntegerType),  can define JMS priority here
    field.messageHeaders(                         //set message properties via headers field
      field.messageHeader("account-id", "body.account_id"),
      field.messageHeader("updated", "body.details.updated_by.time"),
    )
  )
  .fields(
    field.messageBody(
      field.name("account_id").regex("ACC[0-9]{8}"),
      field.name("year").`type`(IntegerType).min(2021).max(2023),
      field.name("account_status").oneOf("open", "closed", "suspended", "pending"),
      field.name("amount").`type`(DoubleType),
      field.name("details").`type`(StructType)
        .fields(
          field.name("name").expression("#{Name.name}"),
          field.name("first_txn_date").`type`(DateType).sql("ELEMENT_AT(SORT_ARRAY(body.transactions.txn_date), 1)"),
          field.name("updated_by").`type`(StructType)
            .fields(
              field.name("user"),
              field.name("time").`type`(TimestampType),
            ),
        ),
      field.name("transactions").`type`(ArrayType)
        .fields(
          field.name("txn_date").`type`(DateType).min(Date.valueOf("2021-01-01")).max("2021-12-31"),
          field.name("amount").`type`(DoubleType),
        )
    )
  )
  .count(count.records(10))
In a unified YAML file:
dataSources:
  - name: "my_solace"
    connection:
      type: "solace"
      options:
        url: "smf://host.docker.internal:55554"
    steps:
      - name: "solace_account"
        options:
          destinationName: "/JNDI/Q/rest_test_queue"
        fields:
          - name: "messageBody"
            fields:
              - name: "account_id"
              - name: "year"
                type: "int"
                options:
                  min: "2021"
                  max: "2022"
              - name: "amount"
                type: "double"
                options:
                  min: "10.0"
                  max: "100.0"
              - name: "details"
                fields:
                  - name: "name"
                  - name: "first_txn_date"
                    type: "date"
                    options:
                      sql: "ELEMENT_AT(SORT_ARRAY(body.transactions.txn_date), 1)"
                  - name: "updated_by"
                    fields:
                      - name: "user"
                      - name: "time"
                        type: "timestamp"
              - name: "transactions"
                type: "array"
                fields:
                  - name: "txn_date"
                    type: "date"
                  - name: "amount"
                    type: "double"
          - name: "messageHeaders"
            fields:
              - name: "account-id"
                options:
                  sql: "body.account_id"
              - name: "updated"
                options:
                  sql: "body.details.update_by.time"
- Click on
Generationand tick theManualcheckbox - Click on
+ Field- Add name as
key - Click on
Select data typeand selectstring - Click
+next to data type and selectSql. Then enterbody.account_id - Click on
+ Fieldand add name asmessageBody - Click on
Select data typeand selectstruct - Click on
+ FieldundermessageBodyand add name asaccount_id - Add additional fields under
messageBodywith your own metadata - Click on
+ Fieldand add name asmessageHeaders - Click on
Select data typeand selectstruct - Click on
+ FieldundermessageHeadersand add name asaccount_id - Add additional fields under
messageHeaderswith your own metadata
- Add name as
Fields
The schema defined for Solace has a format that needs to be followed as noted above. Specifically, the required fields
are:
- messageBody
Whilst, the other fields are optional:
partition- refers to JMS priority of the messagemessageHeaders- refers to JMS message properties
Message Headers
If your messages contain headers, you can follow the details below on generating header values. These can be based off
values contained within you message body or could be static values, just like any other generated field. The main
restriction imposed here is that the key of the message header is static and the value has to be a valid SQL
expression.
In a unified YAML file:
dataSources:
  - name: "my_solace"
    connection:
      type: "solace"
      options:
        url: "smf://host.docker.internal:55554"
    steps:
      - name: "solace_account"
        options:
          destinationName: "/JNDI/Q/rest_test_queue"
        fields:
          - name: "messageHeaders"
            fields:
              - name: "account-id"
                options:
                  sql: "body.account_id"
              - name: "updated"
                options:
                  sql: "body.details.update_by.time"
- Click on
+ Fieldand add name asmessageHeaders - Click on
Select data typeand selectstruct - Click on
+ FieldundermessageHeadersand add name asaccount_id - Add additional fields under
messageHeaderswith your own metadata
transactions
transactions is an array that contains an inner structure of txn_date and amount. The size of the array generated
can be controlled via arrayMinLength and arrayMaxLength.
In a unified YAML file:
dataSources:
  - name: "my_solace"
    connection:
      type: "solace"
      options:
        url: "smf://host.docker.internal:55554"
    steps:
      - name: "solace_account"
        options:
          destinationName: "/JNDI/Q/rest_test_queue"
        fields:
          - name: "messageBody"
            fields:
              - name: "transactions"
                type: "array"
                fields:
                  - name: "txn_date"
                    type: "date"
                  - name: "amount"
                    type: "double"
Warning
Inner field definition for array type is currently not supported from the UI. Will be added in the near future!
details
details is another example of a nested schema structure where it also has a nested structure itself in updated_by.
One thing to note here is the first_txn_date field has a reference to the content.transactions array where it will
sort the array by txn_date and get the first element.
field().name("details")
        .fields(
                field().name("name").expression("#{Name.name}"),
                field().name("first_txn_date").type(DateType.instance()).sql("ELEMENT_AT(SORT_ARRAY(content.transactions.txn_date), 1)"),
                field().name("updated_by")
                        .fields(
                                field().name("user"),
                                field().name("time").type(TimestampType.instance())
                        )
        )
In a unified YAML file:
dataSources:
  - name: "my_solace"
    connection:
      type: "solace"
      options:
        url: "smf://host.docker.internal:55554"
    steps:
      - name: "solace_account"
        options:
          destinationName: "/JNDI/Q/rest_test_queue"
        fields:
          - name: "messageBody"
            fields:
              - name: "details"
                fields:
                  - name: "name"
                  - name: "first_txn_date"
                    type: "date"
                    options:
                      sql: "ELEMENT_AT(SORT_ARRAY(body.transactions.txn_date), 1)"
                  - name: "updated_by"
                    fields:
                      - name: "user"
                      - name: "time"
                        type: "timestamp"
- Click on
+ Fieldand add name asmessageBody - Click on
Select data typeand selectstruct - Click on
+ FieldundermessageBodyand add name asdetails - Add additional fields under
detailswith your own metadata
Additional Configurations
At the end of data generation, a report gets generated that summarises the actions it performed. We can control the output folder of that report via configurations.
In docker/data/custom/application.conf:
- Click on
Advanced Configurationtowards the bottom of the screen - Click on
Folderand enter/tmp/data-caterer/reportforGenerated Reports Folder Path
Execute
To tell Data Caterer that we want to run with the configurations along with the kafkaTask, we have to call execute.
Run
Now we can run via the script ./run.sh that is in the top level directory of the data-caterer/example folder to run the
class we just created.
- Click the button
Executeat the top - Progress updates will show in the bottom right corner
- Click on
Historyat the top - Check for your plan name and see the result summary
- Click on
Reporton the right side to see more details of what was executed
Your output should look like this.
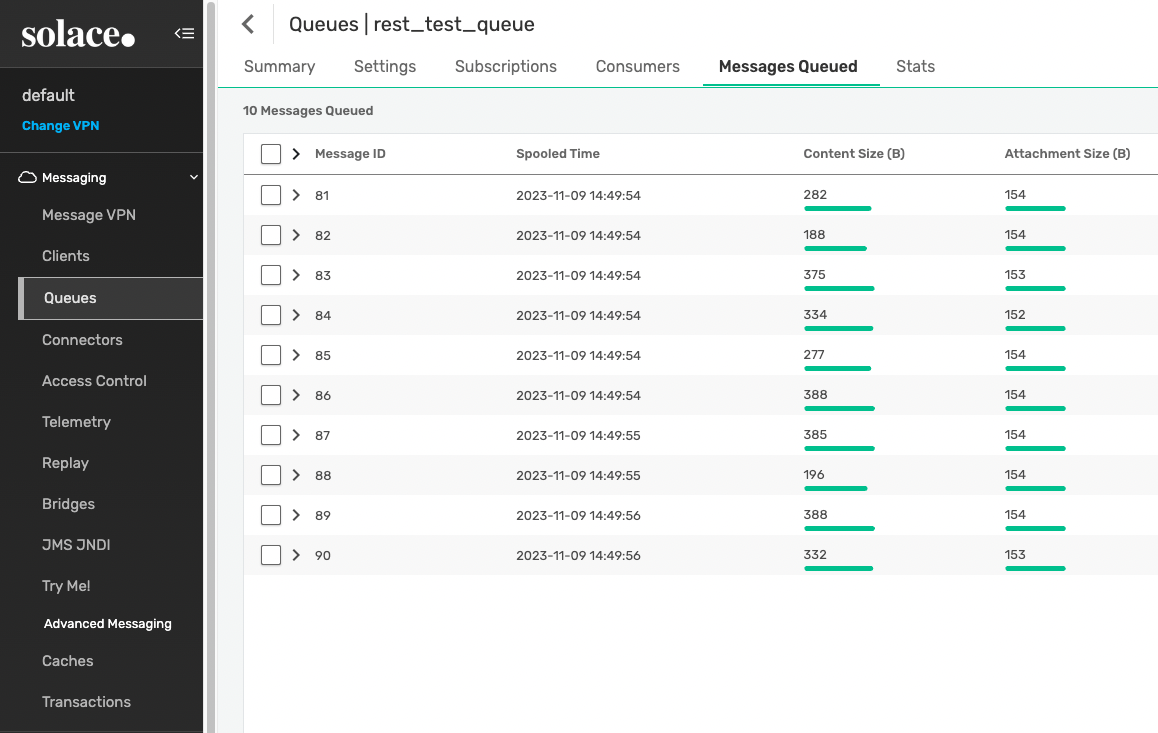
Unfortunately, there is no easy way to see the message content. You can check the message content from your application or service that consumes these messages.
Also check the HTML report, found at docker/sample/report/index.html, that gets generated to get an overview of what
was executed. Or view the sample report found here.